The checked build of the operating system has lots of additional cross-checks, what we at OSR call ?reasonableness checks?, that are performed on operating system data structures and function call arguments passed from drivers. No driver has been sufficiently tested for release until it run on the checked build without displaying obvious problems. In addition, the checked build can be invaluable in assisting driver developers in identifying and locating difficult-to-find problems.
Of course, there are a few issues with running the checked build of the operating system. One of the biggest issues is that the checked build is both larger and slower than the free build. Another issue is that to install the entire operating system checked build, you must maintain a completely separate operating system installation. This means you have to keep things (like registry parameters and versions of the driver being tested) in-synch between the free and checked installations on your system. This can get annoying, in fact.
One solution to these problems is to install just part of the checked build. In this article, we describe how to install just a checked operating system image and checked HAL. See the upcoming release of the Windows DDK for more information on using the checked build.
Partial Checked Installation
An alternative to installing the complete checked build on the target system is to manually install only the checked versions of the operating system image and HAL. This procedure will result in an additional boot option that lets you start the system using just the checked operating system image and HAL, but the free versions of all other system components.
One advantage to this approach, as opposed to installing the complete checked build, is that drivers get the benefit of the operating system and HAL debug cross-checks while performance impact on the entire system is minimized (due to the fact that free versions of system components other than the operating system image and HAL are being used). Another advantage of installing only the checked operating system image and HAL is that this allows a single installation (and thus one system directory, one set of executable components, and one set of registry parameters) to utilize either the checked or the free versions of the operating system image and HAL as determined at boot time.
Installing a Checked OS Image and HAL
Installing the checked versions of the operating system image and HAL involves copying the appropriate files from the checked distribution kit to new, unique, file names in the %systemroot%\system32\ directory. There are two important guidelines to keep in mind when installing checked operating system and HAL images on an otherwise free installation:
1. The operating system image and HAL must be kept in synch at all times. Therefore, if a checked version of the operating system image is used, the checked version of the HAL must be also be used (and vice versa). Failure to keep the operating system image and HAL in synch can result in rendering the system on which they are installed unbootable.
2. Take special care not to overwrite the free versions of the operating system image and the HAL that are installed by default in the installation of the free build. Overwriting the free versions of the operating system image and HAL can result in the system becoming unbootable, and can make it difficult to recover from errors. Therefore, always be careful to copy the checked versions of the operating system image and HAL to unique files names in the %systemroot%\system32 directory.
As long as you keep the above guidelines in mind (and edit carefully!) installing the checked versions of the operating system image and HAL is easy. Now we continue in further detail.
Step 1: Identifying the Files to Install
There are several different versions of the operating system and HAL images supplied as part of the Windows XP distribution kit. These different versions exist to properly support specific combinations of processor and system hardware. When Windows XP is installed, the installation procedure automatically identifies which operating system image and HAL image to use, and copies the appropriate files to the %systemroot%\system32 directory of the system being installed.
The original names of the operating system image files as stored on the distribution media may include one or more of the following,:
NTOSKRNL.EXE - Uniprocessor IA32 architecture systems with 4GB of physical memory or less.
NTKRNLPA.EXE - Uniprocessor IA32 architecture systems with PAE support, that is, more than 4GB of physical memory installed.
NTKRNLMP.EXE - Multiprocessor IA32 architecture systems with 4GB of physical memory or less.
NTKRPAMP.EXE - Multiprocessor IA32 architecture systems with PAE support, that is, more than 4GB of physical memory.
When copied to the %systemroot%\system32\ directory by the Windows XP installation procedure, the operating system image files and HAL use fixed, well known, names. This makes it easy for the loader to locate these files at boot time. The well-known names for these files are:
NTOSKRNL.EXE - Operating system image for IA32 systems with 4GB or less of physical memory;
NTKRNLPA.EXE - Operating system image for IA32 systems with more than 4GB of physical memory.
HAL.DLL - Loadable HAL image.
During system installation, the installation procedure creates each of these files by copying the file appropriate for the system?s hardware from the distribution kit, and renaming it from its original name to one of the fixed names above.
The first step in installing the checked operating system image and HAL is to determine the original names of the images that were copied to your system during system installation. You do this by examining the file %systemroot%\repair\setup.log. An example of this file is shown in Figure 1. This file is used during the system installation process to copy files from the distribution medium to the %systemroot%\system32 directory.
Again, regardless of which of the above files is installed, the non-PAE operating system image file is always called NTOSKRNL.EXE and the PAE operating system image file is always called NTKRNLPA.EXE when they are copied to the %systemroot%\System32\ directory. You can identify which operating system image files were installed on your system by searching setup.log for the above file names. Make a note of which operating system image files are used on your system, because you will need to copy the checked versions of these same files from the checked distribution kit. You will find the standard, well known, name of the operating system image file on the left of the equals sign, and it?s original name from the distribution medium immediately to the right of the equals sign on the same line.
In the example setup.log file shown in Figure 1 you can see that two operating system image files were copied to the \winnt\system32\ directory (which is %systemroot%\System32\) during installation. The file ntkrpamp.exe is copied from the distribution medium to ntkrnlpa.exe and the file ntkrnlmp.exe is copied from the distribution medium to ntoskrnl.exe.
[Paths]
TargetDirectory = "\WINNT"
TargetDevice = "\Device\Harddisk0\Partition1"
SystemPartitionDirectory = "\"
SystemPartition = "\Device\Harddisk0\Partition1"
[Signature]
Version = "WinNt5.1"
[Files.SystemPartition]
NTDETECT.COM = "NTDETECT.COM","f41f"
ntldr = "ntldr","3e8b5"
arcsetup.exe = "arcsetup.exe","379db"
arcldr.exe = "arcldr.exe","2eca9"
[Files.WinNt]
\WINNT\system32\drivers\kbdclass.sys = "kbdclass.sys","e259"
\WINNT\system32\drivers\mouclass.sys = "mouclass.sys","7e78"
\WINNT\system32\drivers\uhcd.sys = "uhcd.sys","10217"
\WINNT\system32\drivers\usbd.sys = "usbd.sys","5465"
(?several similar lines omitted?)
\WINNT\system32\framebuf.dll = "framebuf.dll","10c84"
\WINNT\system32\hal.dll = "halmacpi.dll","2bedf"
\WINNT\system32\ntkrnlpa.exe = "ntkrpamp.exe","1d66a6"
\WINNT\system32\ntoskrnl.exe = "ntkrnlmp.exe","1ce5c5"
\WINNT\inf\mdmrpci.inf = "mdmrpci.inf","96a3"
Figure 1 ? Example of %systemroot%\repair\setup.log
Like the file for the operating system image, the file containing the HAL in the %systemroot%\system32 directory is always named hal.dll. And, again like the operating system image, because the HAL varies with the hardware platform on which Windows XP is installed, the HAL file may have been renamed during the installation process. To find the original name of the HAL file, examine setup.log just as you did for the operating system image file. You will see the file name hal.dll on the left of the equals sign, and the original file name on the right of the equals sign on the same line. For example, in Figure 1 you will see that the hal.dll installed on this system was originally named halmacpi.dll. Carefully make note of the original name of the HAL file.
Warning!
Some HAL files have deceptively similar names. For example, halacpi.dll and halapic.dll are two commonly used HALs. Be careful to use the correct version of the HAL for your system. Selecting the wrong HAL will result in a system that is not bootable.
Once you have identified which operating system image and HAL files are installed on your machine, you?re ready to copy the checked versions of these files to the %systemroot%\system32\ directory.
Step 2: Copying the Checked Files
Now that you know which files to copy, you will need to copy the checked versions of these files to unique file names in the %systemroot%\system32\ directory. Find the files you have identified in the checked distribution kit. Then copy these files to the %systemroot%\system32\ directory of your system, giving them new, unique, file names. The copies of these files may be named just about anything you like, however the file names must adhere to the 8.3 naming convention. One way to ensure unique, 8.3-compliant, file names is to rename the file types from their original file types (.dll or .exe) to .chk when they are copied. Thus, using the example started previously, we would copy files from the checked distribution kit as follows:
|
Original File Name on Checked Distribution |
File Name Copied to in
%systemroot%\system32\ |
|
Ntkrnlmp.exe |
ntkrnlmp.chk |
|
ntkrpamp.exe |
ntkrpamp.chk |
|
halmapic.dll |
halmapic.chk |
Some files in the checked distribution are provided in compressed form. These files are indicated with an underscore character as the last character in their file type. For example, if you look for the file halapic.dll in the checked build distribution, but you find the file halapic.dl_ you have found the correct file but it is compressed.
To decompress compressed files from the checked distribution, use the expand utility found in the %systemroot%\system32\ directory. For example, to expand halapic.dl_ and name the expanded file halapic.chk you can use the following command from a command prompt window:
Ø expand halapic.dl_ halapic.chk
Step 3: Editing 'boot.ini"
Once you have copied the checked files to the %systemroot%\system32\ directory, you will need to create a boot-time option that allows the system to be started using these checked files. You do this by editing the file boot.ini.
boot.ini resides in the root directory of the boot volume of your system, and is normally set as a ?hidden? and ?system? file. As a result, it typically will not be displayed by the default ?dir? command from a command prompt window. You may verify the existence and attributes of boot.ini using the ?attrib? command from a command prompt window. Once you have verified that you can find boot.ini, you must change its attributes so that it is no longer marked as being either ?hidden? or ?system?. This can be done using the following command:
Ø attrib ?s ?h boot.ini
See the example in Figure 2.
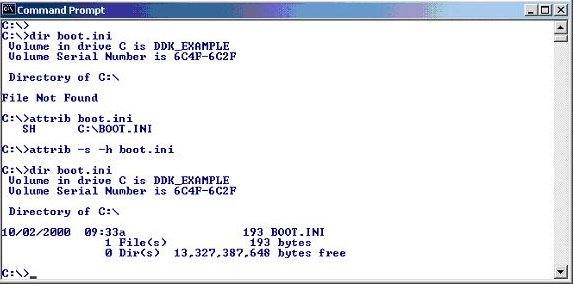
Figure 2 ? Locating and Setting Attributes in ?boot.ini?
Once the ?system? and ?hidden? attributes have been removed from boot.ini, you can edit the file with a text editor such as notepad. The goal of editing boot.ini is to create a new boot-time option that allows you to start the system with the checked version of the operating system image and HAL that you previously copied to %systemroot%\system32\.
Edit boot.ini using any text editor, such as notepad. When you begin your editing session, the unmodified version of boot.ini will look something like the example shown in Figure 3.
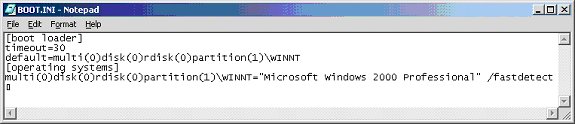
Figure 3 ? Example of file ?boot.ini? Before Editing
The file boot.ini controls the operating system options that are displayed at boot time. The example file in Figure 3 shows a computer with a single operating system installed. It is possible that the version of boot.ini on your system has multiple lines under the [operating systems] heading. This will be the case if you have more than one operating system (or operating system version) installed on the computer, such as if you have both Windows 2000 and Windows XP installed on the same computer, or you have a Beta and released version of Windows XP installed on the same computer.
Locate the line that describes the operating system for which you want to install the checked operating system image and HAL. You can identify this system by the name of the %systemroot% directory which appears after the first backslash in each of the lines in the [operating systems] section. In Figure 3, the %systemroot% directory for the one system image in boot.ini is named \WINNT.
Once you have located the line that describes your desired operating system, make a copy of the line, and paste it on at the end of boot.ini, in the [operating systems] section, on a line by itself. The result is shown in Figure 4.

Figure 4 ? Copying the Desired Operating System Line
Continue editing boot.ini, and add to the end of the copied line the following options:
/kernel=osfilename /hal=halfilename
where osfilename is the name (file name and type) of the checked version of the operating system image file that you previously copied from the checked distribution kit, and halfilename is the name (file name and type) of the checked version of the HAL that you previously copied from the checked distribution kit.
If the line that describes your operating system contains the /PAE option, be sure to utilize the checked version of the operating system image that supports PAE (as previously described). If the line that describes your operating system does not have the /PAE option (as that shown in the Figures), utilize the checked version of the operating system image that you copied without PAE support.
The text that appears within quotes on each operating system boot line in boot.ini is displayed at boot time to identify the operating system to start. Before completing your edits, be sure to change the text within quotes on the line you are editing to identify that the checked version of the operating system image and HAL are being used (e.g., ?Win2K Checked?). When your editing is complete, your version of boot.ini should look similar to that shown in Figure 5.

Figure 5 ? ?boot.ini? After Final Editing
Once these changes have been made, save the changes and exit from the editor. The next time you boot this system, a new operating system boot option will be displayed that allows you to select your checked operating system image and HAL.
We are grateful to Microsoft for permission to use OSR-authored content scheduled for inclusion in the Windows DDK, which served as the basis for this article. For lots of additional information, including some never-before documented details, be sure to check out future releases of the Windows DDK.