 Click Here to Download: Code Associated With This Article Zip Archive, 46KB
In a previous issue of The NT Insider (V5N3 May-June 1998), we wrote about using Windows Management Instrumentation (WMI) in your drivers as a way of easily integrating with the Windows Performance Monitor (Perfmon). Unfortunately, when we wrote the original article, it was based on Windows NT 4.0 (SP4 and Later), all the OS pieces necessary for this to occur did not make it into the system. Fortunately for us, Windows XP has finally solved this, so in this article, we will talk about what your driver needs to do in order to make this work.
Much documentation on WMI has been added to the DDK and added to the SDK. Hopefully, the documentation along with this article will give you enough information to add WMI to your driver.
Note: There have been some recent name changes coming down from Redmond (really?). The former Windows Based Enterprise Management (which was actually more of an initiative started by multiple vendors) is now called WMI, and the former WMI piece is now called the WMI extensions for WDM.
Quick Overview
According to Microsoft, WMI publishes information, configures device settings, and supplies event notification from device drivers. WMI is part of the WDM architecture, but any driver that is written for Windows XP can use the WMI API (Yes, you can do this for Win98/ME, and NT4.0 (SP4 or later), but this article is about Windows XP). The data distributed by WMI is listed in the following bullets:
- Published data – A standard set of WMI data that will be built into the Windows 2000/XP-supplied port/class drivers. Each standard driver is required to return this standard data, consult the DDK for data appropriate for each class.
- Custom data – Provided through private driver extensions.
- Secure data - Provided through Windows XP security descriptors for a designated usage.
- Expensive data (optional) – Expensive data is data whose collection significantly affects the performance of the driver. Therefore this data should only be collected when a requestor specifically requests it. By default, your driver should not collect the expensive data. When a management application requests the expensive data, WMI signals your driver to start collecting the data. WMI also keeps a reference count and signals the driver to stop collecting the data when the last application interested in that data terminates. Fortunately, we the driver writer, not WMI, decides what data is expensive to collect. And the mechanism for indicating that data is expensive to collect is extremely simple.
- Event Notifications – Event notification is a key feature of WMI, and it allows a driver to notify the WMI extension when it is detecting hardware events and errors. The event can then be passed to WMI for corrective action based on the specific event that has occurred.
WMI also allows a management application to configure a device. A management application may need to reconfigure a device based upon some driver-raised event or because of the data collected by the management application. For example, let’s say that your NIC driver starts to encounter lots of errors on the network. It could fire a WMI event that some management application monitoring events would notice. This management application could be so kind as to notify the network manager via mail (how ironic, maybe mail doesn’t work because of the network), who would go out and manually fix the network problem. However, the network management application could just as easily be written to have issued a WMI operation to the network driver to modify its behavior, by changing one of the driver’s settings through WMI, in order to correct the detected problem.
Figure 1 displays a somewhat simplified view of the WMI architecture. Note that other drivers designed specifically for Windows XP can also use WMI.
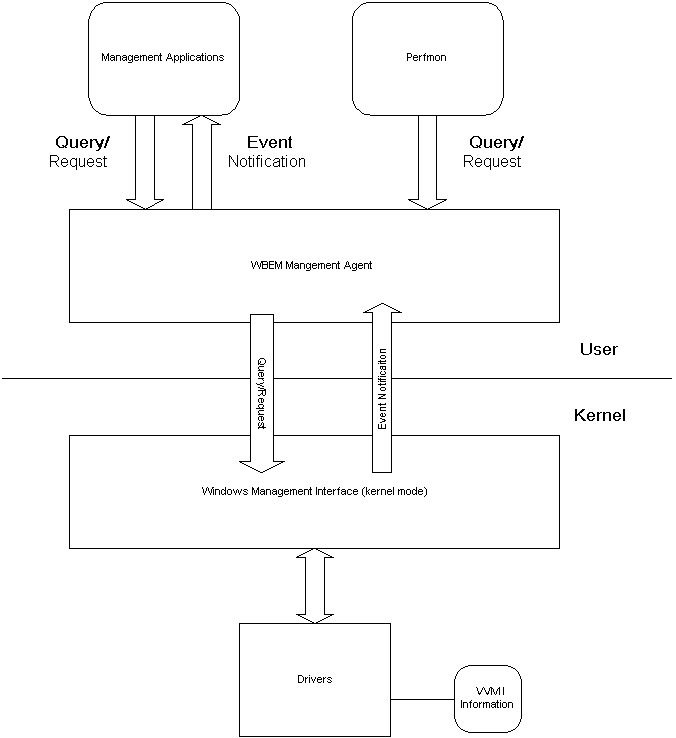
Figure 1 – Simplified View of the WMI/WBEM Architecture
So you’re probably saying to yourself, why is WMI of any interest to me? That’s what I said at first glance too, but then I thought about how I could use this API to my advantage.
First of all, WMI allows a device driver writer to very easily instrument a driver with performance counters and easily get the data displayed via Perfmon (This bypasses the agony of creating a performance dynamic link library (DLL) for the old Perfmon). Those of you who have tried this will know what I am talking about. Secondly, drivers now have a way via WMI’s event interface to notify administrators, or anybody that is listing for WMI events (management agents), of problems or worrisome activity (e.g. read or write errors). I don’t know about you, but I’ve always felt that nobody looked at the Event Log until it was too late. So that concludes the overview, let’s add WMI to our Nothing driver so that we can integrate it with Perfmon.
Getting Started
Any driver that processes IRPs can support WMI. To start receiving WMI IRPs the driver write must do the following:
- Create an MOF (Managed Object Format) file describing the Information that the driver wants to publish. If the driver being created is a standard driver then the driver utilizes the classes contained in mofcore.mof, which is in the DDK.
- Update your sources file and create a makefile.inc file that be used to compile your MOF file and add it to your driver resources file (.rc).
- Call IoWMIRegistrationControl to register with WMI.
- Support the IRP_MJ_SYSTEM_CONTROL dispatch entry point.
Creating an MOF File
A Managed Object Format (MOF) file contains an ASCII text description of classes and data to be added to the Common Information Model Object Manager (CIMOM) database. When a MOF file is submitted to the MOF compiler, the compiler parses the contents of the MOF file and makes calls to CIMON based on each parsed item. CIMOM responds to these calls and adds data to the CIMOM database file as required. The snippet from our “NOTHING.MOF” file is shown in Figure 2.
[WMI,
Dynamic,
Provider("WmiProv"),
Locale("MS\\0x409"),
Description("Performance counter class that keeps track of the
performance of the driver") : amended,
DisplayName("Nothing Counts") : amended,
guid("{B10FBABC-2A16-4e1a-8650-90AF9F7461A1}"),
PerfDetail(100),
HiPerf
]
class Nothing_PerformanceCounter : Win32_PerfRawData
{
[key, read]
string InstanceName;
[read] boolean Active;
[WmiDataId(1),
DisplayName("Total Irp Count") : amended,
PerfDefault,
CounterType(0x00000000), // PERF_COUNTER_RAWCOUNT
DefaultScale(0),
PerfDetail(100),
read,
Description("Count of irps received") : amended
] uint32 TotalIrpCount;
[WmiDataId(2),
DisplayName("Total Irp Rate") : amended,
CounterType(0x10410400), // PERF_COUNTER_COUNTER
DefaultScale(0),
PerfDetail(100),
read,
Description("Rate of irps received") : amended
] uint32 TotalIrpRate;
[WmiDataId(3),
DisplayName("WMI Irp Count") : amended,
CounterType(0x00000000), // PERF_COUNTER_RAWCOUNT
DefaultScale(0),
PerfDetail(100),
read,
Description("Count of WMI irps received") : amended
] uint32 WmiIrpCount;
};
Figure 2 — nothing.mof (abridged)
The Nothing_PerformanceCounter class describes the WMI information that the Nothing Driver will return to the caller when information is requested for this class. How are the classes distinguished? Well, like everything else these days, it is described by a GUID. When WMI communicates with your driver, it indicates which information it is interested in by specifying the GUID of the requested information. It can do this because when the driver registers with WMI it specifies the GUIDs that it supports. Thus, when the Nothing driver receives a request querying for the information associated with this class’s GUID, the Nothing Driver returns the data in the format of the data structure that is created when the Nothing_PerformanceCounter class contained within the .MOF file is compiled. The structure created by the MOF complier for the class is shown in Figure 3.
// Nothing_PerformanceCounter - Nothing_PerformanceCounter
#define Nothing_PerformanceCounterGuid \
{ 0xb10fbabc,0x2a16,0x4e1a, { 0x86,0x50,0x90,0xaf,0x9f,0x74,0x61,0xa1 } }
DEFINE_GUID(Nothing_PerformanceCounter_GUID, \
0xb10fbabc,0x2a16,0x4e1a,0x86,0x50,0x90,0xaf,0x9f,0x74,0x61,0xa1);
typedef struct _Nothing_PerformanceCounter
{
//
;
#define Nothing_PerformanceCounter_TotalIrpCount_SIZE sizeof(ULONG)
#define Nothing_PerformanceCounter_TotalIrpCount_ID 1
//
ULONG TotalIrpRate;
#define Nothing_PerformanceCounter_TotalIrpRate_SIZE sizeof(ULONG)
#define Nothing_PerformanceCounter_TotalIrpRate_ID 2
//
ULONG WmiIrpCount;
#define Nothing_PerformanceCounter_WmiIrpCount_SIZE sizeof(ULONG)
#define Nothing_PerformanceCounter_WmiIrpCount_ID 3
//
ULONG TotalReceiveByteCount;
#define Nothing_PerformanceCounter_TotalReceiveByteCount_SIZE
sizeof(ULONG)
#define Nothing_PerformanceCounter_TotalReceiveByteCount_ID 4
//
ULONG TotalTransmitByteCount;
#define Nothing_PerformanceCounter_TotalTransmitByteCount_SIZE sizeof(ULONG)
#define Nothing_PerformanceCounter_TotalTransmitByteCount_ID 5
} Nothing_PerformanceCounter, *PNothing_PerformanceCounter;
Figure 3 — Structure Created by .mof file
It sounds easy, and in fact it is. If you’re not trying to do anything fancy (it gets complicated when you’re using dynamic instance names), you should be able to get your driver integrated with Perfmon in just a couple of hours.
Compiling the Driver and the MOF File
In order to get the MOF file integrated with your driver, you must do two things. First, add the name of the MOF file to the SOURCES line of your drivers build file. Secondly, a makefile.inc file must be created in order to run wmimofchk.exe. This utility takes as input the binary MOF file (.bmf file created when the MOF file is compiled) and checks that the classes, properties, methods and events specified in the .bmf file are valid for WMI use. It is also capable of generating the following:
- C language header file (.h file) that can be used by the driver;
- C language source file which contains stubs for WMI driver code;
- Hex version of .bmf data which can be included in the driver source for supplying dynamic MOF data at runtime;
- Test application templates in VBScript or HTML
Our makefile.inc for the nothing driver is shown in Figure 4. How do we get the build environment to generate our .BMF file? As I mentioned, all you have to do is add it to your SOURCES line, as described in Figure 5.
# generate auxilary files from the binary mof (bmf) file
#
# nothingdata.h has defs for the guids, data structures and definitions
# of the method ids.
#
# nothing.vbs is a ready to run applet that will query all classes
# in the mof. Once you install your driver, run the script
# at the command line by typing: nothing.vbs.
clean:
del nothingdata.h nothing.vbs
$(O)\nothing.bmf : $(O)\nothing.mof
$(O)\nothing.vbs $(O)\nothingdata.h $(O)\nothing.x: $(O)\nothing.bmf
wmimofck -hnothingdata.h -tnothing.vbs -xnothing.x $(O)\nothing.bmf
Figure 4 — Makefile for the “Nothing” Driver
MAJORCOMP=ntos
MINORCOMP=osr
TARGETNAME=nothing
TARGETPATH=obj
TARGETTYPE=DRIVER
TARGETLIB=$(DDK_LIB_PATH)\wmilib.lib
MSC_WARNING_LEVEL=-W3 -WX
#
# Uncomment the following line to have the driver report MOF data via a
# a WMI query rather than via a resource.
#C_DEFINES=$(C_DEFINES) -DUSE_BINARY_MOF_QUERY
INCLUDES=$(BASEDIR)\inc;..\inc
SOURCES=nothing.mof nothing.rc nothing.c nothingpnp.c \
nothingIO.c nothingpower.c nothingwmi.c
NTTARGETFILE0=$(O)\nothingdata.h \
$(O)\nothing.x \
$(O)\nothing.vbs
Figure 5 — SOURCES to “Nothing” Driver
So, as you can see, nothing.mof is added to the SOURCES line. The MOF compiler will be run on that image and nothing.bmf will be generated. The nothingdata.h, nothing.x, and nothing.vbs files will be created when wmimofck is run on the nothing.bmf file. NOTE: We must be sure to modify the nothing.rc file so that the .bmf file is imported into our nothing.rc file (shown in Figure 6) and put into our driver image.
#include
#include
#define VER_FILETYPE VFT_DLL
#define VER_FILESUBTYPE VFT2_UNKNOWN
#define VER_FILEDESCRIPTION_STR "WDM Nothing driver with WMI support"
#define VER_INTERNALNAME_STR "nothing.sys"
#define VER_ORIGINALFILENAME_STR "nothing.sys"
#include "common.ver"
#ifndef USE_BINARY_MOF_QUERY
//
// Include the compiled binary mof as a resource
MofResourceName MOFDATA nothing.bmf
#endif
Nothing.rc file
Figure 6 — nothing.rc
Registering with WMI
Registering with WMI is simple. All you have to do is call IoWMIRegistrationControl() passing in the address of your Device Object and the value WMIREG_ACTION_ REGISTER. Once this completes successfully, your driver will start receiving WMI requests via your IRP_MJ_SYSTEM_CONTROL dispatch entry point. Remember, if you register, you must unregister. This is done using the same IoWMIRegistrationControl() call, but this time passing the value WMIREG_ACTION_ DEREGISTER.
Supporting IRP_MJ_SYSTEM_CONTROL
When WMI starts sending your driver requests, it does so by sending IRP_MJ_SYSTEM_CONTROL IRPs to your driver. Your driver can handle these requests in one of two ways. In the first method, your driver looks at the Minor Function code of the request and handles the minor request accordingly. In the second and easiest method, you can set up a WMILIB_CONTEXT and use the WMI library support routines. You will have to write code to support this, but it is far less code than if you had to process the WMI IRPs yourself. Since we implemented the use of WMILIB_CONTEXT in the Nothing driver that goes along with this article (see www.osr.com for the driver) let’s dig into that. Figure 7 defines the WMILIB_CONTEXT structure.
//
// This structure supplies context information for WMILIB to process the
// WMI irps. Memory for this structure may be paged.
typedef struct _WMILIB_CONTEXT
{
// WMI data block guid registration info
ULONG GuidCount;
PWMIGUIDREGINFO GuidList;
//
// WMI functionality callbacks
PWMI_QUERY_REGINFO QueryWmiRegInfo;
PWMI_QUERY_DATABLOCK QueryWmiDataBlock;
PWMI_SET_DATABLOCK SetWmiDataBlock;
PWMI_SET_DATAITEM SetWmiDataItem;
PWMI_EXECUTE_METHOD ExecuteWmiMethod;
PWMI_FUNCTION_CONTROL WmiFunctionControl;
} WMILIB_CONTEXT, *PWMILIB_CONTEXT;
Figure 7 — WMILIB_CONTEXT
Before the Nothing driver registers with WMI it sets up this structure (see NothingWMIRegistration in nothingwmi.c).
Then whenever the Nothing driver gets called at its IRP_MJ_SYSTEM_CONTROL dispatch routine it calls WmiSystemControl(). This routine calls the appropriate function that you registered in your WMILIB_CONTEXT structure and tells you what to do with the IRP. The Nothing driver handles this as shown in Figure 8.
status = WmiSystemControl(&fdoData->WmiLibInfo,
DeviceObject,
Irp,
&disposition);
//
// Check the disposition of the request, so that we can determine
// what to do.
//
switch(disposition) {
case IrpProcessed:
{
// This irp has been processed and may be completed/ //pending.
break;
}
case IrpNotCompleted:
{
// This irp has not been completed, but has been
// processed. We will complete it now
IoCompleteRequest(Irp, IO_NO_INCREMENT);
break;
}
case IrpForward:
case IrpNotWmi:
{
// This irp is not a WMI irp or is a WMI irp targeted
// at a device lower in the stack.
IoSkipCurrentIrpStackLocation (Irp);
status = IoCallDriver (fdoData->DeviceToSendIrpsTo, Irp);
break;
}
default:
{
// We really shouldn’t get here, but if we do just // forward..
KdPrint(("Forwarding WMI Request.\n"));
IoSkipCurrentIrpStackLocation (Irp);
status = IoCallDriver (fdoData->DeviceToSendIrpsTo, Irp);
break;
}
}
return(status);
Figure 8 — WmiSystemControl()
So as you can see in the preceding code, the driver is informed about the status of the IRP that it processed when it called WMISystemControl(). WMISystemControl() looks at input IRP and calls the appropriate routine that we wrote to handle the input IRP. The responsibility of the routine is to do the indicated processing for the information defined by the input GUID. Since we’re concerned with returning performance information to Perfmon, let’s look into a query for information.
The routine in Figure 9 NothingWmiQueryDataBlock() is called when a WMI query operation is received as you can see, the routine is quite simple. We look at the input GUID index and compare it to the list of GUIDs that we registered with. Then, if the GUID index matches our supported index we process the request by filling in the input buffer with the requested information. Is this simple or what?
NTSTATUS NothingWmiQueryDataBlock(IN PDEVICE_OBJECT DeviceObject,
IN PIRP Irp, IN ULONG GuidIndex,IN ULONG InstanceIndex, IN ULONG InstanceCount,
IN OUT PULONG InstanceLengthArray, IN ULONG OutBufferSize, OUT PUCHAR Buffer)
{
PNOTHING_DEVICE_EXT fdoData;
NTSTATUS status;
ULONG sizeNeeded;
//
// we only ever register 1 instance per guid
//
ASSERT((InstanceIndex == 0) && (InstanceCount == 1));
fdoData = (PNOTHING_DEVICE_EXT) DeviceObject->DeviceExtension;
switch (GuidIndex) {
case NothingPerformanceCountGuidIndex:
{
sizeNeeded = sizeof(Nothing_PerformanceCounter);
if (OutBufferSize >= sizeNeeded)
{
PNothing_PerformanceCounter IrpCounter = (PNothing_PerformanceCounter)Buffer;
IrpCounter->TotalIrpCount = fdoData->NothingPerformanceData.TotalIrpCount;
IrpCounter->TotalIrpRate = fdoData->NothingPerformanceData.TotalIrpCount;
IrpCounter->WmiIrpCount = fdoData->NothingPerformanceData.WmiIrpCount;
IrpCounter->TotalReceiveByteCount = fdoData-> Nothing PerformanceData.TotalReceiveByteCount;
IrpCounter->TotalTransmitByteCount = fdoData->NothingPerformanceData.TotalTransmitByteCount;
*InstanceLengthArray = sizeNeeded;
status = STATUS_SUCCESS;
} else {
status = STATUS_BUFFER_TOO_SMALL;
}
break;
}
break;
default:
status = STATUS_WMI_GUID_NOT_FOUND;
break;
}
status = WmiCompleteRequest( DeviceObject,
Irp,
status,
sizeNeeded,
IO_NO_INCREMENT);
return status;
}
Figure 9 — NothingWmiQueryDataBlock()
Well, if you’ve done everything correctly, when you run Perfmon and click on the “add counts” button, you should see something similar to what is displayed in Figure 10.
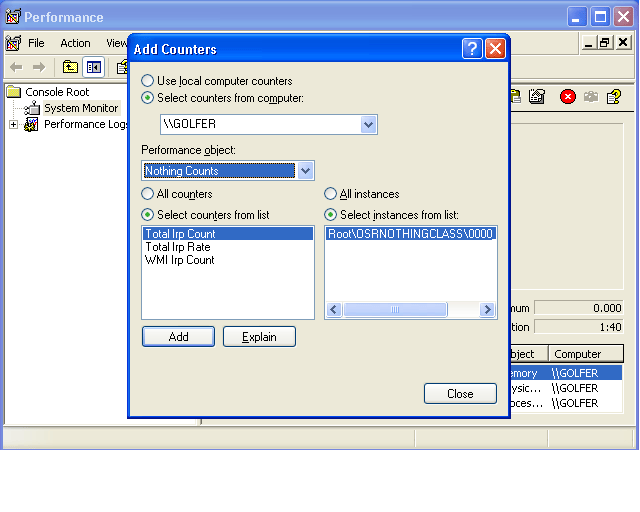
Figure 10 – Perfmon Integration


 Post Your Comment

