In a previous article (“Converting Windows NT V4 Drivers to WDM/NT V5”, Vol. 5, Issue 2), we discussed the bare essentials of how WDM and NT V5 device drivers get their hardware resources via IRP_MJ_PNP, IRP_MN_START_DEVICE. In this article, we’ll explore implementing Plug and Play in WDM/NT V5 drivers in more detail, focusing on managing device state.
What's the Point?
PnP requests in WDM/NT V5 are identified by an IRP major function code of IRP_MJ_PNP, and a unique IRP minor function code. There are more than 20 PnP minor functions defined. Of these, 13 operations potentially apply to “function drivers” and the remainder apply exclusively to bus drivers.
Some of the PnP functions that can apply to function drivers will be of very little interest to most device drivers. For example, IRP_MN_QUERY_INTERFACE is used by a driver to locate the interface structure used to perform a direct procedure call into another driver. The documentation says this is used by PCMCIA cards. I’m sure that’s true. But this isn’t the sort of request that your ordinary toaster oven would be interested in.
So, you may be thinking: Plug and Play (PnP) is all well and good – maybe even important -- if you’re implementing something like a PC Card device. Obviously, this type of device can be dynamically inserted and removed, and it would be nice if the device’s driver knew what was going on. But does PnP apply to other types of devices? Does it apply to a PCI-based toaster oven driver? In short, the answer is “Yes”. PnP support applies to all device drivers in WDM/NT V5.
While PnP is used to implement many functions, most device (function) drivers will probably be interested in only the following three categories of PnP IRPs:
· IRPs that are used to manage device startup, including dynamic device insertion.
· IRPs that are used to by the PnP Manager to implement resource rebalancing.
· IRPs that are used to manage dynamic device removal.
If you have a typical PCI-based device, that device (and probably the bus that device is on) will not need to support unplugging the device while the system is running. However, from the list above, you can see that even if your device isn’t dynamically removable, there are at least two more categories of PnP IRPs that your driver will need to support. These are the IRPs that will be our primary focus in this article.
Device Startup
As we discussed in our previous article on WDM/NT V5 Plug and Play, the way devices are configured will change significantly between NT V4 and NT V5. The work that was done in NT V4 in a driver’s DriverEntry() routine, will be done in NT V5 (and Win98 using WDM) in a combination of DriverEntry(), and the Add Device and PnP dispatch entry points. To briefly recap, the steps a driver uses to create a device instance and identify its hardware resources are as follows:
1. When the driver is loaded, DriverEntry() is called. In this routine the driver performs any driver-wide initialization, including exporting its entry points. Hardware resources are not located and Device Objects are not typically created at this entry point in NT V5.
2. Next, the driver is called at its AddDevice() entry point. This entry point is called whenever the PnP Manager has a Physical Device Object for the driver to handle. A pointer to the Physical Device Object, created by the underlying bus driver, is passed into the driver’s AddDevice() entry point. The driver creates a Functional Device Object, and attaches it (using IoAttachDeviceToDeviceStack()) to the Physical Device Object. No hardware resources have yet been identified for the device.
3. The PnP Manager sends an IRP_MJ_PNP, IRP_MN_START_DEVICE IRP to the driver. This IRP identifies the hardware resources the driver is to use for the device. A CM_RESOURCE_LIST of both raw and translated resources are passed to the driver in one of the PnP IRP’s I/O stack locations. At this point, the driver connects to interrupts, and generally initializes the device.
Following the above procedure, the device should be fully initialized and ready to process requests.
Stopping Devices
After the device is on-line, the driver only needs to deal with the device potentially being stopped or removed. While they might sound the same, these two operations are very different.
A device may be stopped by the PnP Manager when the PnP Manager needs to “rebalance” the hardware resources in use by the device. For example, let’s say Device A requires (according to the information in its configuration space) any 64 contiguous bytes of port addresses, in the range of 0x0000 to 0xFF00. Further, let’s assume that the PnP Manager has already started Device A, and in its IRP_MN_START_DEVICE IRP, allocated addresses in port I/O space ranging from addresses 0x6000 to 0x6039.
Next, the PnP Manager just happens to start Device B. Perhaps Device B is newly added to the system. Device B, not being nearly as tolerant as Device A, requires 16 port I/O space addresses which (according to Device B’s configuration space) must be located at addresses 0x6010 to 0x601F. See the problem? Assuming Device B and Device A are on the same system, the problem is that the set of port addresses that Device B requires is already in use by Device A. And, to make matters worse, these devices could coexist, if the PnP Manager hadn’t already assigned (by chance) the addresses needed by Device B to Device A. That is, Device A is using the addresses required by Device B, but Device A would be perfectly happy to use lots of other ranges of 64 bytes of port space.
The solution to this problem in WDM/NT V5 is to have the PnP Manager ask Device A if it can change the hardware resources that it is using. This is accomplished by the PnP Manager sending Device A an IRP_NMN_QUERY_STOP_DEVICE. If Device A’s driver indicates that it can change the hardware resources it is using, the PnP Manager can then ask Device A to disconnect from any interrupts and return its hardware resources (specifically, the port I/O space addresses it is using) by issuing an IRP_MN_STOP_DEVICE. The PnP Manager can then issue the resources required to satisfy Device B, and then allocate a new set of resources for Device A. Both devices can then be started successfully, by sending each one an IRP_MN_START_DEVICE with new lists of hardware resources to use.
Of course, the PnP Manager could get part-way through its process of allocating resources, and decide that it doesn’t need to have Device A return its resources after all. Suppose, for example, Device B needs additional resources that are in use by a third device, and that third device cannot give those resources up. In this case, the PnP Manager sends Device A’s driver an IRP_MN_CANCEL_STOP_DEVICE to, in effect, tell it, “Nevermind…keep using those resources that you said you’d be willing to return if necessary.”
Removing Devices
Removing a device is completely different than stopping a device. When a user requests a device be detached from the system, the PnP Manager issues an IRP_MN_QUERY_REMOVE to the device’s driver. The driver can then indicate whether an orderly removal of the device can be accomplished. If the driver responds that an orderly removal of the device is possible, the PnP Manager can send an IRP_MN_REMOVE_DEVICE. The driver then returns any allocated resources, and deletes the Device Object representing the device. The device is now gone, and the driver no longer needs to track its state. If the device is later returned to the system (for example, it’s plugged back in), the PnP Manager will issue another call to the driver’s AddDevice() entry point and an IRP_MN_START_DEVICE IRP.
Things can get really fun when a user just decides to remove a device from the system without first telling the operating system. Envision a user popping out a PC Card, without first clicking on the appropriate little applet on the toolbar. Hey, who hasn’t done it, right? In this case, on NT V5 the PnP Manager sends the driver an IRP_MN_SURPRISE_REMOVAL IRP. The driver responds by attempting to clean up as best it can. The PnP Manager follows this up with an IRP_MN_REMOVE_DEVICE, which the driver processes as described above (after having received an IRP_MN_QUERY_REMOVE). In Win98, the IRP_MN_SURPRISE_REMOVAL IRP is not used. In this case, the driver receives a “surprise” IRP_MN_REMOVE_DEVICE request, without first having received an IRP_MN_QUERY_REMOVE. Thus, the driver needs to clean up as best it can, return its hardware resources, and delete its Device Object.
What's the Policy?
The mechanics of implementing PnP support in a device driver aren’t difficult. You’ve got a device, and you get some IRPs with minor function codes that give you info from the PnP Manager. There typically aren’t any parameters to check or pass back. So, what’s the difficulty in supporting PnP?
The difficulty is in defining a set of policies that are right for your driver, and for your users, and then designing how you are going to implement those policies in your driver. Like most complex features, support for PnP is implemented best when its designed into your driver from the start. While lots of us will be forced to add PnP support to existing drivers, if you have the luxury of designing a new driver you really should think about how you’re going to implement PnP from the very beginning. Don’t leave PnP out of your thinking, and try to bludgeon it into your driver later if you can avoid it!
Here’s a simple example of the types of policies I’m talking about: In every PnP-enabled driver, there is a time when you have a Device Object, but you do not have hardware resources to support that Device Object. At a minimum, this is true during the time period after your AddDevice() entry point is called, and before you receive the IRP_MN_START_DEVICE PnP IRP. During these times, obviously, if you receive an IRP from a user, you need to deal with it without attempting to touch your device’s hardware. How your driver deals with this IRP is a matter of policy for you to decide. Do you queue the request, and try to process it later? Do you fail it back to the user?
Take the example one step further. Your device could be started, and actively processing requests, when you receive a request from the PnP Manager that asks if you can stop your device for resource rebalancing (an IRP_MN_QUERY_STOP_DEVICE). Do you tell the PnP Manager that, yes, you can stop your device? If not, you’re device won’t be playing well with others. If you do, do you wait for any in-progress requests to complete before returning success to the PnP Manger, or do you wait for the IRP_MN_STOP_DEVICE request before stopping request processing? What do you do with any user IRPs that may arrive during this time, or while your device has been stopped?
Stately Operation
The examples we’ve seen in the DDK and elsewhere that demonstrate how to manage Plug and Play events have all used some combination of boolean flags and events. It doesn’t take many discrete flags, combined with the several different types of incoming PnP IRPs, before things get mighty confusing. It wasn’t until we opted to implement a state-based approach in our driver that we managed to get PnP under control.
To make things easy for ourselves we elected to start with the state diagram that’s on the first page of Part 2 of the Setup, Plug & Play, Power Management Design Guide in the DDK. To this diagram, we added a few additional useful states. This resulted in the state diagram shown in Figure 1.
This state diagram shows seven states, though several of these states could be combined (being different only in terms of their names and not necessarily in terms of how requests are treated while in that state). With the states and state transitions defined, it’s only a matter of figuring out what you want to do in each state. For a driver, this will typically mean figuring out:
1. What to do in each state when receiving an IRP (other than a PnP IRP) at a Dispatch Entry point. That is, do we try to start the IRP on the device (assuming the device is available), do we reject the request, or do we queue the IRP for possible later initiation.
2. What to do in each state when a request completes on the device. That is, is a new request started (if one is available), as soon as the current request is completed?
3. What to do prior to each state transition. That is, it’s all well and good to have a diagram that says, “I’m in STARTED state. When I get a IRP_MN_SURPRISE_REMOVAL, I go to SURPRISE_REMVOED state”, but what do I do in the driver to effect that state transition.
This can be pretty easily defined out using a couple of tables, shown below. For each state, Table 1 shows what to do when receiving an IRP from a user (such as an IRP_MJ_READ or IRP_MJ_WRITE), and what to do when an IRP is completed on the device. Table 2 shows the same information in Figure 1, but also shows the action the driver will take in each state on receiving each IRP.
|
STATE NAME |
When a (non-PnP) IRP Is Received |
When a (non-PnP) IRP Is Complete on The Device… |
|
NEVER_STARTED |
Complete it with STATUS_UNSUCCESSFUL |
N/A |
|
STARTED |
Start it if the device is not busy, otherwise queue it |
Complete it, and try to start another one |
|
REMOVE_PENDING |
Complete it with STATUS_UNSUCCESSFUL |
Complete it, and try to start another one. |
|
REMOVED |
Complete it with STATUS_UNSUCCESSFUL |
N/A |
|
SURPRISE_REMOVED |
Complete it with STATUS_UNSUCCESSFUL |
N/A |
|
STOP_STOPPED |
Queue it for later initiation |
N/A |
|
STOP_PENDING |
Queue it for later initiation |
Complete it |
Table 1 – IRP Processing by Device State
|
STATE NAME |
When Receiving This PnP Request IRP_MN |
Take This Action |
Enter This New State |
|
NEVER_STARTED |
_START
_DEVICE |
Pass IRP down; When done, Initialize hardware, connect to interrupts |
STARTED |
|
STARTED |
_QUERY
_REMOVE |
If device can be removed, wait for all requests on all queues to be completed, then pass IRP down. |
REMOVE_PENDING |
|
|
_SURPRISE
_REMOVAL |
Abort all queued and in-progress requests without reference to hardware; Pass IRP down. |
SURPRISE_REMOVED |
|
|
_QUERY
_STOP |
If device can be stopped, pass IRP down. |
STOP_PENDING |
|
|
_REMOVE
_DEVICE |
Abort all queued and in-progress requests without reference to hardware; Pass IRP down; When done, return resources. |
REMOVED |
|
REMOVE_PENDING |
_CANCEL
_REMOVE
_DEVICE |
Pass request down; When done, try to initiate new request on device |
STARTED |
|
|
_REMOVE
_DEVICE |
Return hardware resources; Pass IRP down. When done, detach and return Device Object. |
REMOVED |
|
SURPRISE_REMOVED |
_REMOVE
_DEVICE |
Return hardware resources; Pass IRP down. When done, detach and return Device Object. |
REMOVED |
|
STOP_PENDING |
STOP_DEVICE |
Wait until all active requests are complete; Return hardware resources; Pass IRP down. |
STOPPED |
|
|
CANCEL
_STOP_DEVICE |
Pass request down; When done, try to initiate new request on device |
STARTED |
|
STOPPED |
START_DEVICE |
Pass IRP down; When done, Initialize hardware, connect to interrupts |
STARTED |
Table 2 – Device State Processing and Transitions
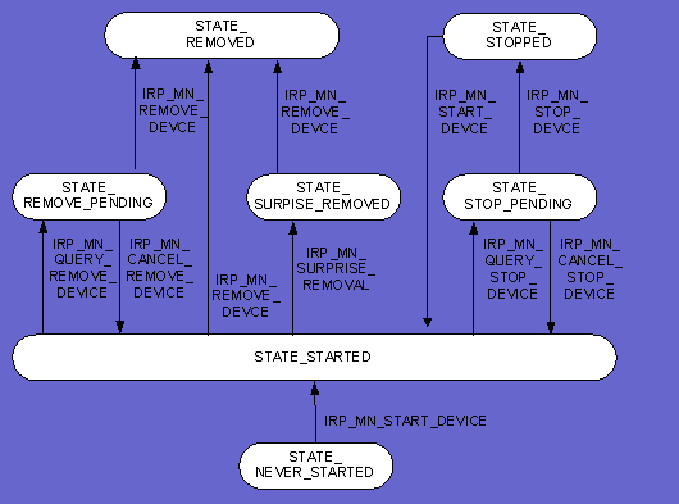
Figure 1 -- Device States In NT V5/WDM
Using the Tables
It’s important to understand that these tables aren’t our attempt to tell anyone how their device should work. The state transitions and actions taken in each state are how we decided we wanted our device to work.
For example, you notice that when we’re running (STATE_STARTED) and we get an IRP_MN_QUERY_REMOVE, we stop accepting requests to be queued but also we allow any requests which have been queued to the device so far to complete. That is, in this case we’re not just allowing those requests that are actually active on the hardware to complete, we’re waiting until the active and queued requests are all complete. This works if your device is fast, and you don’t have a request that can pend for long periods of time. If your device doesn’t work this way, you’ll need to come up with another policy.
Similarly, we decided that when we received a QUERY_STOP_DEVICE we’d just pass the request on down to the underlying bus driver (assuming the stop request could be accommodated by our device), and transition to STOP_PENDING state. We do not initiate any new requests in STOP_PENDING state, however. When we get the actual STOP_DEVICE request in STOP_PENDING state, we wait for the requests that are currently active on the hardware to complete, and then return our resources and pass the STOP_DEVICE request along to the bus driver. Again, what you do in your device will depend on what makes sense for you.
Of course, there is another answer to the question “How do you handle PnP IRPs?” That answer is: You don’t. NT V4 legacy drivers running on NT V5 certainly don’t handle PnP IRPs, and they work “just fine” on NT V5 systems. However, such drivers also do not participate in either Plug and Play or power management. Thus, if you have a situation such as the one described previous for Device A and Device B (where Device A had a set of resources that Device B required), if your driver is Device A it will keep Device B from loading. This is not good, and typically does not make customers happy. So, our recommendation is that if you do implement PnP, make sure you implement IRP_MN_QUERY_STOP_DEVICE and IRP_MN_STOP_DEVICE. If you’re thinking about just implementing IRP_MN_START_DEVICE – and not the rest of PnP – we suggest putting off implementing PnP support at all until you have time to “do it right.” As we said above, your NT V4 driver will run on NT V5.
Implementation
Implementing the PnP states described previously requires four specific facilities in the driver:
1. A mechanism for keeping track of the state of a specific device.
2. A way of queuing IRPs as they arrive from requestors, if those IRPs are not supposed to be started on the device immediately due to the device being in an inopportune state.
3. A way of keeping track of how many requests are queued to the device at any one time.
4. A method of knowing if any requests are active on the device at any time.
Obviously, tracking device state is as easy as defining a location in the Device Object to hold the current state for that device. So, that satisfies requirement 1, above, pretty easily.
In a driver that queues its own IRPs, requirement 2 is already satisfied. Having such a facility already integrated into your driver is a good argument for a driver queuing its own IRPs, instead of using System Queuing.
Once we have a mechanism for queuing IRPs, keeping track of the number of requests queued is simply a matter of incrementing a counter when an IRP is queued, and decrementing that same counter when the IRP is either dequeued or completed (depending on your specific implementation).
Finally, if a driver queues its own IRPs, it will already need a mechanism to know if any requests are active on a given device.
Thus, the actual requirements for implementing PnP can be fairly easily met, especially if you’re designing your driver from scratch. Of course, if you have an existing driver that uses System Queuing that you need to retrofit to support PnP, you have a bit more of a challenge.
Also, we don’t mean to suggest that you won’t have to write any new code of course. You will obviously have to code-up the functions to handle PnP IRP handing. And, you’ll probably have to write some functions to do things like cancel all IRPs on all queues for a given device. But this is hardly difficult stuff.
In Summary
We hope we’ve given you some ideas about how to design support for PnP in your driver. For us, getting a handle on Plug and Play required our taking a more “holistic” look at how our driver functioned. We found that looking at our device using a state-based approach made handling all the various conditions (arriving IRPs, completing IRPs, last PnP IRP received, current PnP IRP received) much clearer and more straight-forward. Once we understood what the various states were, our task was reduced to simply deciding how we wanted our device to behave in each of those states. This was not an overwhelming task.
We’ve got sample code for you to peruse, if you like. You can find the code for our sample driver (which is a Packet-Based busmaster DMA device driver) on the web site associated with our book at http://www.osr.com/book, in the NT V5 section. This driver has been tested on both NT V5 and Win98.
The original, NT V4 driver (which is the sample driver that is narrated in our book) is available in the Downloads section of the same web site.


 Post Your Comment
