Trust Yet Verify -- All About Driver Verifier
The NT Insider, Vol 11, Issue 3&4, May-August 2004 | Published: 18-Aug-04| Modified: 18-Aug-04
Can you spot the bug in this root enumerated WDM function driver’s DriverEntry? (see Bug 1)
We can guarantee that the driver that this came from does not blue screen, it does not hang, and it functions 100% properly in every way. Nonetheless, this code has a bug in it (of course this bug was artificially added, no code that we write has bugs so we have to go back and add them in for illustrative purposes).
NTSTATUS
DriverEntry(PDRIVER_OBJECT DriverObj, PUNICODE_STRING RegistryPath)
{
DriverObj->MajorFunction[IRP_MJ_CREATE] = NothingCreateClose;
DriverObj->MajorFunction[IRP_MJ_CLOSE] = NothingCreateClose;
DriverObj->MajorFunction[IRP_MJ_READ] = NothingRead;
DriverObj->MajorFunction[IRP_MJ_PNP] = NothingPnp;
DriverObj->MajorFunction[IRP_MJ_POWER] = NothingPower;
DriverObj->DriverExtension->AddDevice = NothingAddDevice;
DriverObj->DriverUnload = NothingUnload;
return(STATUS_SUCCESS);
}
Bug #1
The bug is that this code does not supply an IRP_MJ_SYSTEM_CONTROL handler, which is required for any WDM driver. The reason that the driver this came from shows no signs of being broken is that its PDO does not implement any WMI functionality. But, because we’re all lazy, code seems to continue to show up all over the place. Slap this DriverEntry into a new driver whose PDO does support WMI and you’ve got a bonafide bug on your hands.
OK, so you install your function driver and the WMI functionality of the bus driver is inaccessible. You look, see you don’t have an IRP_MJ_SYSTEM_CONTROL handler, and five minutes later your code is working properly. Not exactly the kind of bug you’re going to be burning a weekend trying to track down, so who cares?
If you didn’t catch the last bug, here’s another chance. In a disk filter driver, you decide that you really want a count of the number of outstanding reads on the disk. This means that you want to bump your count in your read dispatch entry point and set up a completion routine so you can decrement it when the read is done. Easy enough, check out Bug #2—Increment Read Dispatch Entry Point.
NTSTATUS DiskFilterRead(PDEVICE_OBJECT DeviceObject, PIRP Irp)
{
PDISK_FILTER_EXT devExt =
(PDISK_FILTER_EXT)DeviceObject->DeviceExtension;
InterlockedIncrement(&devExt->OutstandingReadCount);
IoCopyCurrentIrpStackLocationToNext(Irp);
IoSetCompletionRoutineEx(DeviceObject,
Irp,
DiskFilterReadComplete,
devExt,
TRUE,
TRUE,
TRUE);
return IoCallDriver(devExt->DeviceToSendIrpsTo, Irp);
}
Bug #2 -- Increment Read Dispatch Entry Point
How can this be wrong? You were even careful to use InterlockedIncrement and IoSetCompletionRoutineEx! Let’s check out the completion routine, see Bug #2—Completion Routine.
NTSTATUS DiskFilterReadComplete(PDEVICE_OBJECT DeviceObject, PIRP Irp, PVOID Context)
{
PDISK_FILTER_EXT devExt = (PDISK_FILTER_EXT)Context;
InterlockedDecrement(&devExt->OutstandingReadCount);
return STATUS_CONTINUE_COMPLETION;
}
Bug #2 -- Completion Routine
Returning STATUS_CONTINUE_COMPLETION? This was obviously written by a true DDK savant. Running it seems to work OK, for a while that is. Then all of a sudden things start to get weird. First, maybe Explorer starts to hang, and then another app, and another, and another until nothing works at all.
You have absolutely no idea what’s going on, but you notice that just about every other completion routine that you can find has this line in it:
if (Irp->PendingReturned) {
IoMarkIrpPending(Irp);
}
You don’t really know why it would fix it, but you add it anyway and like magic the problem disappears. So, you’ve fixed all of the bugs that you’ve chosen to acknowledge that day and head for home.
Real Bugs Never Die
Being the good developer that you are, you realize that you obviously have some deficiencies in your WDM knowledge (and who doesn’t) so you need to go back and make sure that these bugs aren’t in the twenty other drivers that you cut and pasted into existence. Did we mention developers are lazy? Wouldn’t it be nice to have had someone ask you to turn around so they could smack you in the back of the head the first time you wrote the code, instead of finding the bugs days, weeks, or months later? Or, wouldn’t it be nice to receive detailed errors and fix instructions when an application hangs after your filter is loaded, instead of being left scratching your head to find the problem?
Lesson: You should have been using Driver Verifier. If you had been running Driver Verifier on your target machine while you were debugging your driver, you would have found these problems right off the bat. Live and learn? We hope so.
Not Just a Testing Tool
Don’t be deceived by the fact that the documentation on Driver Verifier is listed under Tools for Testing Drivers in the DDK. A more appropriate section title would be, Tools for Testing and Developing Drivers. It is definitely not something that you just want to flip on two weeks before your product ships in the final round of testing. It can find problems ranging from the innocuous and easy to fix, like what we saw in Bug #1, to show-stopping, architectural bugs like broken locking hierarchies or application hangs.
Before we move on, gather around for a quick tale. Not too long ago in a popular driver development newsgroup far, far away, some poor dev wrote in saying that he had enabled Driver Verifier for his driver, but his driver wasn’t really being exercised in any way. Why wasn’t Driver Verifier calling him with all sorts of messed up requests? Much to my surprise he wasn’t derided into a new profession, but in case you’re not aware: for the most part, Driver Verifier is passive in its bug finding. The majority of its tests will only test code paths that you exercise while it is monitoring your driver’s activity.
Using our two earlier examples, the IRP_MJ_SYSTEM_ CONTROL bug would have been discovered by just enabling Driver Verifier on your driver, because it would send you a bogus WMI request and fail if you mishandled it. The second bug, however, would only be flagged by Driver Verifier when the driver below you returned STATUS_PENDING. Therefore, Driver Verifier is only a part of a balanced testing and developing breakfast (an entire discussion on testing would take up a whole issue of The NT Insider and then some…Oh wait, it did!).
It’s the O/S in Verification Mode, not a Separate Entity
Driver Verifier is actually part of the Windows O/S, it is not a separately loaded module. This puts it in a position to have an extraordinary level of power in monitoring the interaction between drivers and the kernel. Driver Verifier basically places a wrapper around your driver to closely monitor how it manages all of the various kernel objects and resources. Because of this, it should be pretty obvious that at some point, you will want to run your tests without Driver Verifier enabled to ensure that it is not masking any subtle timing bugs.
Starting Driver Verifier
Because Driver Verifier is so tightly integrated with the O/S, new versions of it ship with new versions of the O/S. One thing to note then, is even if you’re targeting versions of the operating system way back to Windows 2000, you should try to do your testing during development on the latest version of the O/S to get the latest Driver Verifier checks. We’ll be using an XP system throughout this article, so there might be some differences in options when running on 2000 or Server 2003. These will be called out when appropriate. Also, almost all of the Driver Verifier options that we’ll see are also accessible from the command line. Run Driver Verifier from a command window with the "/?" switch to get detailed info.
To start Driver Verifier, simply run verifier.exe, located in the SystemRoot\System32 directory, and select the Create custom settings option (see Figure 1).
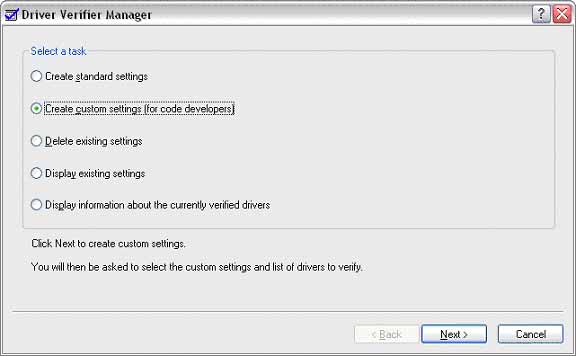
Figure 1 -- Verifier Manager: Create Custom Settings
Next, select individual settings from a full list, as shown in Figure 2 and 3.
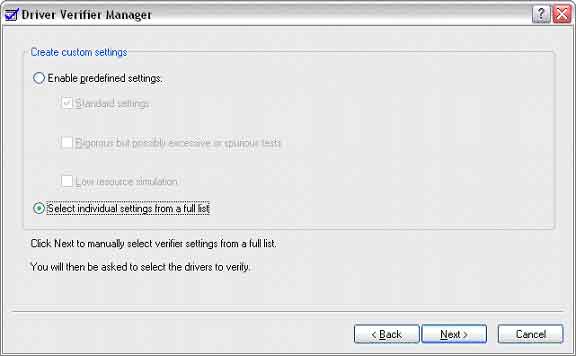
Figure 2 -- Verifier Manager: Individual Settings
From the resulting dialog (see Figure 3), you’ll generally want to select all of the available options except for Low resources simulation, and sometimes, Special pool during your development. We’ll see why in a minute.
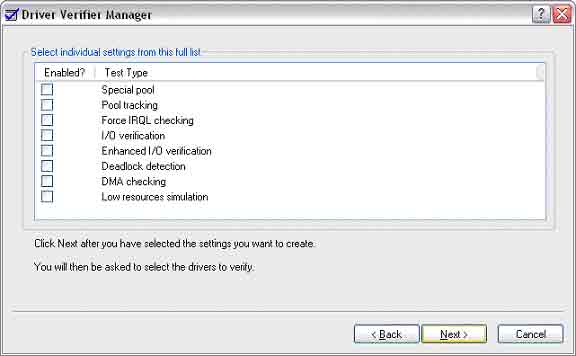
Figure 3 -- Verifier Manager: Enabling Test Types
The Tests
So what exactly do the tests listed in the settings dialog do? We’ll talk about each test in turn to find out.
Automatic Tests
There are some tests that you’ll get just for the price of admission, and they’re worth every penny.
The automatic checks catch all sorts of "Oops!" errors that are easy to make and difficult to track down. A short list of interesting checks:
- Attempting to allocate zero bytes of memory
- Freeing a non-pool address
- Freeing a previously freed block of pool
- Marking an allocation as MUST_SUCCEED, which is deprecated
- Releasing a spinlock twice
- Unloading with outstanding timers, lookaside lists, worker threads, etc.
Special Pool
By enabling the Special Pool option, you enable two safeguards for one of the most insidious types of driver error: memory corruption.
The first set of potentially memory corrupting errors that this option will catch is buffer overruns - accessing memory after a valid address range. Driver Verifier catches these by adding what are called "guard pages" to the tail of every allocation that the driver makes. Driver Verifier then marks these pages as "no access" so that an access violation will occur if these pages happen to be touched by the driver. If the access violation does trigger, Verifier traps it and bugchecks the system in a more controlled way than usual. By that we mean the bugcheck code and stack trace will be very explicit about the error and the stack trace will pinpoint the offending code exactly. This is important, because it is very common for a driver that is writing to a random location off the end of its buffer to corrupt another driver in the system. When a situation like that happens, the system will bugcheck and typically blame the wrong driver. These types of blue screens are extremely hard to debug and even harder to explain to your customers. Note that according to the DDK documentation, you can use the GFlags utility to alternatively choose to have the guard pages added to the head of the allocations instead of the tail. This would allow you to catch buffer underrun errors, (accessing memory before a valid address range), which are less common.
The other set of potentially memory corrupting errors that Special Pool will catch are accesses to memory after it has been freed. This is another problem that is particularly tricky to track down in the wild, because it can easily go undetected for long periods of time. It generally only causes a problem if the system is under heavy load and the address is quickly recycled to another driver (or even the same driver!) in the system. Driver Verifier plays a pretty cool trick in order to catch these errors. What it does is free the memory that is backing the allocation, but leaves the virtual to physical address mapping (i.e. the PTE) active but marked as "no access". This means that if the driver then attempts to access the memory, an access violation will occur and the system will bugcheck.
Special Pool is not a magic bullet for a couple of reasons though. First of all, it will not catch stray pointer accesses that point to valid allocations. It is such a common practice for one component in the system to allocate memory and pass it for use in another component that checking for something like this would be impossible. Also, as has been previously reported in The NT Insider, when enabling Special Pool for your driver, your pool allocation tags are not preserved. This means that if you are trying to track down memory leak issues, it’s probably best to not test with Special Pool enabled.
Pool Tracking
The Pool Tracking option enables one check that is similar to the Special Pool overrun check and another to track resource cleanup.
The overrun check in Pool Tracking does essentially what the Special Pool check does – it adds a page to the tail of memory allocations, except the guard pages are not marked as "no access." Instead, they are filled in with a particular pattern. If the pattern is modified when the memory block is freed, the system bugchecks. This is slightly less helpful than the special pool option because it only catches the corruption after the fact, making it more difficult to find the true source.
The other check that Pool Tracking enables concerns driver unloading. When the driver is unloaded, Pool Tracking makes sure that all of the resources allocated by the driver have been freed. If the driver is unloaded and it has not freed all of its memory resources, the system bugchecks and indicates how much memory has been leaked. Further, if pool tagging has been enabled, the pool tags of the leaked memory allocations are also indicated. This option is extremely helpful if your driver supports being unloaded, but if you are a file system driver, for example, this check does not provide any additional help.
Force IRQL Checking
We always stress in our classes that you cannot write a driver if you do not understand IRQLs. If you spend a few minutes browsing the NTDEV and NTFSD newsgroups, it will quickly become obvious that not everyone has taken an OSR seminar. But, even if you know the rules like the palm of your hand, you still need to obey them and the Force IRQL Checking option can help you do just that.
Force IRQL Checking enforces the number one IRQL rule: you must not touch any pageable memory at IRQL DISPATCH_LEVEL or above. The reason for this, of course, is that if the pageable memory happens to not be resident, a DISPATCH_LEVEL software interrupt must be executed to bring the page into memory. If the code that is currently running is already at DISPATCH_LEVEL or above, the DISPATCH_LEVEL interrupt cannot run and the page fault cannot be satisfied. Because the Memory Manager aggressively caches pages, it is entirely possible that this bug will go unnoticed during your testing because the pages have already been faulted in at an earlier time by a thread running at a proper IRQL.
The way that Driver Verifier enforces the pageable memory and IRQL rule is by paging out all pageable memory after every IRQL raised to DISPATCH_LEVEL or above. This ensures that all accesses to memory regions marked as pageable at an elevated IRQL generate a DRIVER_IRQL_NOT_LESS_OR_EQUAL bugcheck.
I/O Verification
I/O Verification gets brken down into two creatively named levels: Level 1 and Level 2. On Windows XP you always get both Level 1 and Level 2 when you select I/O Verification from the Driver Verifier GUI, but on Windows 2000, Level 2 must be explicitly enabled (see the DDK docs for details on how to do this).
When Level 1 I/O Verification is enabled, all IRPs are allocated out of special pool, which is helpful in catching some common errors (if you’ve ever tried to fill in the current stack location of an IRP that you’ve allocated, then you definitely want to flip on Level 1 I/O Verification). Other Level 1 checks include:
- Calling IoCompleteRequest on an IRP with a cancel routine still set
- Calling IoCallDriver from a dispatch routine at a different IRQL than you were called at
- Calling IoCallDriver with an invalid device object
Level 2 I/O Verification expands upon Level 1 I/O Verification with one difference: If a kernel debugger is attached, Level 2 I/O Verifications will not bugcheck the system. Instead, an ASSERT is issued with a detailed description of the error and, in some cases, even a URL where you can get more information. If you choose to ignore these errors, the machine will continue to run, potentially giving you the ability to fix your code and reload your driver without a reboot. This is quite a convenience, to say the least. Also, Level 2 I/O Verification comprises over fifty I/O checks. Here are some good ones:
- Calling IoCallDriver on an IRP with a cancel routine still set
- Deleting a device that is attached to a lower device without first calling IoDetachDevice
- Completing IRP_MJ_PNP requests that you don’t handle, instead of passing them down
- Manually copying a stack location instead of using IoCopyCurrentIrpStackLocationToNext and not clearing the upper driver’s completion routine
Enhanced I/O Verification
Enhanced I/O Verification is a feature added to Driver Verifier in Windows XP to add to the laundry list of I/O checks done by Driver Verifier. These checks are reported in the same way as the Level 2 I/O Verifications in that they appear as ASSERTs when a kernel debugger is attached and can be ignored without bug checking the system.
Does the golden rule we violated in Bug #2, "If you mark the IRP as pending you must return STATUS_PENDING," sometimes escape you? If so, Enhanced I/O Verification is your friend as it monitors your IRPs and ensures that you follow this rule. Another neat trick that this option enables is mixing up the PnP load order of devices in the system. This ensures that just because driver A starts before driver B on every system you’ve run your driver on, you don’t code to that fact.
This is also the option that will trap Bug #1, by sending bogus PnP, Power, and WMI IRPs to your stack to check for proper processing of IRPs of each type.
Deadlock Detection
Deadlock Detection is another Driver Verifier option that was added to Windows XP. Enabling it causes Verifier to track all of your driver’s acquires and releases of spinlocks, mutexes and fast mutexes and ensures that a locking hierarchy is in place and is followed. An interesting thing to note here is that Deadlock Detection is constantly monitoring your acquires and releases, and building a large graph of the use of your locks throughout the driver. If it finds a potential deadlock condition, it will bugcheck the system. What this means is that your code, as written, may never hit a deadlock, but if there’s a potential for it, the system will still bugcheck.
The thinking here is that you should have a locking hierarchy in place and always follow it, even if in some places you "know better." This provides a more robust code base that is less prone to develop locking issues in the future.
If your system does bugcheck due to Deadlock Detection, the !deadlock WinDBG command may be used to get detailed information revealing why the bugcheck occurred.
DMA Checking (a.k.a. DMA Verification a.k.a. HAL Verification)
Also only available in XP and later, DMA Checking enables a wide array of checks that ensure proper use of the DMA APIs. One nice feature that you get with DMA Checking is that it causes all DMA transfers to be double-buffered by Verifier. Though the chances are small that this will discover bugs in your code, it guarantees that your driver will work properly on PAE systems with greater than 4GB of RAM.
An exhaustive list of the checks can be found in the DDK documentation, but here are some of the more interesting ones:
- Catch buffer overruns and underruns on the DMA buffer
- Check proper allocation and destruction of adapters, common buffers and scatter gather lists
- Proper use of map registers
- Use of valid DMA buffers (i.e. ensuring they are not NULL or pageable)
The DDK documentation lists over twenty checks that it makes to your DMA operations when enabled, so this option is something that you’re, without a doubt, going to want to enable if you’re writing a driver that supports DMA.
The !dma WinDBG extension knows about DMA Checking and can be used to get extended information about DMA adapters currently being verified.
Low Resources Simulation
Low Resources Simulation is the one test that we generally recommend that you do not enable until your final rounds of testing. Enabling this option will result in random failures for memory requests. What your driver does in these situations and how gracefully it must handle them is entirely device and environment specific, but at the very least the system should not bug check because of a NULL pointer dereference.
How your driver handles low resource conditions is device specific because, for most drivers, just checking for NULL and returning an error is sufficient. However, there are several types of drivers that need to be fully capable of handling these situations by falling back to memory that was previously allocated when resources were not scarce. No testing cycle is complete until your driver has proven to not bring down the entire system because of a call to ExAllocatePoolWithTag failing.
Disk Integrity Checking
Disk Integrity Checking was added to Driver Verifier in Server 2003. If you are working with a driver in the storage stack, this option can be extremely helpful in finding data corruption errors. Every time a sector is read from or written to the disk, this check computes the CRC and, if it has been previously accessed, compares it to its previous CRC. If the CRCs don’t match, the system will bugcheck. As you can imagine, enabling this option puts a serious strain on the resources of the system, so it should generally not be enabled during day-to-day testing and developing.
IRP Logging
IRP Logging was also added in Server 2003 and is sort of an oddball Driver Verifier option. What it does is keep a copy of the last twenty IRPs that the driver being verified has received in a circular buffer. You can then extract the information about the last twenty IRPs to a text file by using the DC2WMIParser utility. There doesn’t appear to be anything documented about how to retrieve this info from the debugger, and Driver Verifier usually lets you know that something went wrong by bugchecking the system, so we’re not quite sure enabling this option is very useful. But, it’s there so check it out and see if it suits any of your needs.
Conclusion
If you aren’t running with Driver Verifier enabled from day one of development, you’re not being a responsible member of the driver development community. Period. This is not some esoteric hardcore developer utility that no one but you will ever run, it’s a standard O/S utility that ships in-box. This means that if you don’t run it, your users will, and we all know how much it sucks when customers start complaining (for some reason the sales and marketing people just hate that).
We didn’t mention it here, but there are special Driver Verifier options for SCSI and graphics drivers so if you’re in one of those spaces, check out the documentation in the DDK. Also, be on the lookout for Static Driver Verifier (SDV), a new utility that will be released at a date TBD that will be able to do static analysis on your driver and find bugs actively at compile time (which should help out my aforementioned newsgroup buddy). For the latest information on SDV you can keep hitting refresh at http://www.microsoft.com/whdc/devtools/tools/sdv.mspx or just stay tuned here and we’ll let you know what we know, when we know it.
User Comments
Rate this article and give us feedback. Do you find anything missing? Share your opinion with the community!
 Post Your Comment
"great read"
Rating:

20-Dec-12, Jaskaran Khurana
|
|


