A standard data structure that all software developers end up using at some point is the linked list. A linked list structure has a list head (a structure that contains a pointer to the first entry in the list) and one or more entries in the list that have pointers to the next entry in the list.
For kernel-mode programming, the standard header file ntdef.h that defines basic constructs such as ULONG, UCHAR, and the like also provides definitions for two varieties of linked lists: Doubly-linked lists and singly-linked lists. In a doubly-linked list, each entry (as well as the list head) contains a forward and backward pointer, which are typically referred to as the FLINK and BLINK pointers, respectively. In the singly-linked list, each entry (as well as the list head) contains just a forward pointer typically referred to as the NEXT pointer.
This article describes Windows kernel-mode doubly-linked lists and how they are used.
Doubly-Linked Lists
As mentioned previously, Windows provides standard support for doubly-linked lists. In terms of implementation, the lists are in fact "circularly linked." What this means is that the FLINK points to the next entry in the list, while the BLINK points to the previous entry in the list and the FLINK of the last entry in the list points to the head of the list. Figure 1 illustrates this concept.
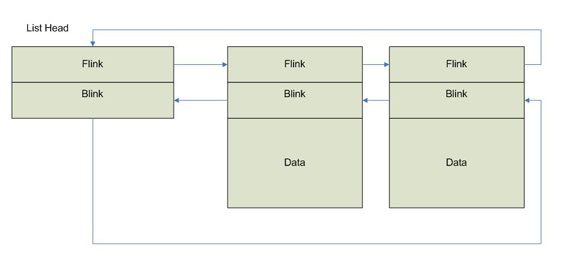
Figure 1 - Windows Doubly-Linked List |
Because Windows lists are circularly linked, this implies a few things:
-
Insertions and deletions can be done at any point in the list
-
There is no limit as to the number of entries that can be in the list, and
-
A break in the list can be detected, even if a FLINK or a BLINK has been trashed
Windows linked lists utilize a List Head. This is a structure that marks the beginning of the list (contains FLINK and BLINK but typically contains no other data). By default ,Windows does not provide any synchronization mechanisms to protect access to the list. We'll discuss the special case of synchronized list access later in this article.
List Heads and List Entries
Each Windows doubly-linked list begins with a list head. A list head in Windows is defined by a LIST_ENTRY structure which is defined as follows (in ntdef.h):
typedef struct _LIST_ENTRY {
struct _LIST_ENTRY *Flink;
struct _LIST_ENTRY *Blink;
} LIST_ENTRY, *PLIST_ENTRY;
List heads are initialized using the InitializeListHead macro. This routine performs the following operation, ListHead->Flink = ListHead->Blink = ListHead, which makes the list head point to itself. This indicates that the list is empty. Each structure to be added to a list should also be defined to contain a LIST_ENTRY field. This field would be used to add the structure to a list. Certain Windows data structures that can be stored on lists already have LIST_ENTRY structures defined in them, for example IRPs , DPCs and KTIMERs to name a few. Define your own structure to insert in a list as follows:
typedef struct _MYDATASTRUCT {
// List Entry to be used to place
// structure on list
LIST_ENTRY ListEntry;
// Data Definitions Follow...
ULONG x;
ULONG y;
} MYDATASTRUCT, *PMYDATASTRUCT;
InitializeListHead
InitializeListHead is used to initialize a doubly-linked list in Windows. This routine sets the FLINK and BLINK of the list head to the address of the list head structure as shown in Figure 2.
|
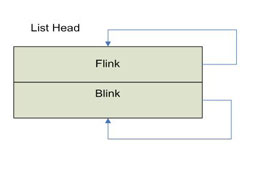
Figure 2 - Empty Doubly-Linked List |
This definition might lead you to ask two questions: (1) How do you know if the list is empty and, (2) how do you know if you are at the end of the list?
The answers to these questions really are quite simple: You know the list is empty if the content of the FLINK is equal to the address of the list head. You can perform this check conveniently using the Windows-supplied macro IsListEmpty which takes a PLIST_ENTRY (i.e. List Head) as input. If the list is empty IsListEmpty returns TRUE, otherwise it returns FALSE.
Similarly, you can tell if you're at the last entry in a list if the FLINK in that entry points back to the list head. Pretty straight-forward, right?
Next, let's talk about how you add entries to a list. To do this, Windows provides two routines InsertHeadList and InsertTailList. As the names implies, InsertHeadList adds an entry to the front of the list, while InsertTailList adds an entry to the end of the list.
InsertHeadList
As mentioned above, InsertHeadList is used to add an entry at the beginning of a doubly-linked list. Let's consider the example illustrated in Figure 3 and Figure 4. In Figure 3 we show a doubly-linked list containing one entry called "Entry 1". Both the FLINK and BLINK of the list head point to "Entry 1" since it is the only entry in the list. In Figure 4 we show the list after "Entry 2" has been added to the head of the list. The operations performed by InsertHeadList in order to add the new entry "Entry 2" are as follows:
- Save away the contents of list heads FLINK in a temporary PLIST_ENTRY variable Tmp ("Entry 1").
- Update "Entry 2's" FLINK with the contents of Tmp (Tmp points to "Entry 1").
- Update "Entry 2's" BLINK with the address of the passed-in list head.
- Set Tmp->BLINK (i.e. "Entry 1" FLINK) to the address of "Entry 2".
- Set the address of the passed-in list head FLINK to Entry 2.
|
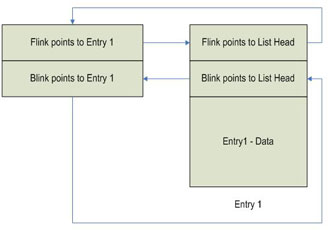
Figure 3 - A list With One Entry |
|
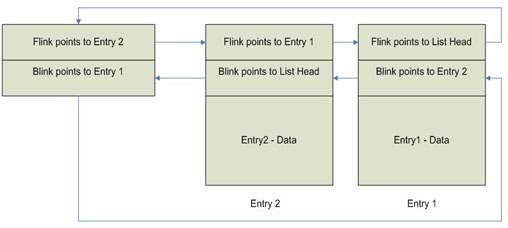
Figure 4 -InsertHeadList Inserting Entry 2 |
InsertTailList
Now that we know how to insert an entry at the head of the list, adding an entry to the tail of the list is a snap. Let's consider the example illustrated in Figure 5. Using Figure 3 again we show a doubly-linked list containing one entry called "Entry 1". Both the FLINK and BLINK of the list head point to "Entry 1" since it is the only entry in the list. In Figure 5 we show the list after "Entry 2" has been added to the tail of the list. The operations performed by InsertTailList in order to add the new entry "Entry 2" are as follows:
- Save away the contents of list heads BLINK in a temporary PLIST_ENTRY variable Tmp ("Entry 1").
- Update "Entry 2's" FLINK with the address of the passed-in list head.
- Update "Entry 2's" BLINK with the contents of Tmp (Tmp points to Entry 1).
- Set Tmp->FLINK (i.e. "Entry 1" FLINK) to the address of "Entry 2".
- Set the list head BLINK to point to "Entry 2".
|
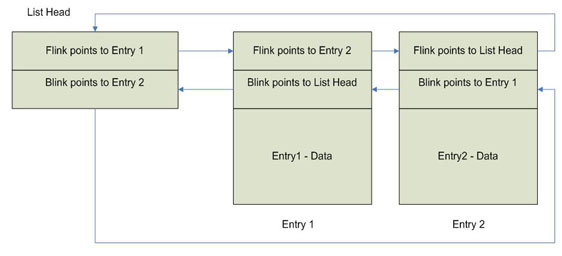
Figure 5 - InsertTailList Inserting Entry 2 |
Inserting an Entry into the Middle of a List
Believe it or not, an InsertEntryList function does not exist in Windows, why? Well, because it is not necessary! If you look at the illustrations in the previous figures you should notice that each entry in the list contains a FLINK and BLINK just like the head of the list (essentially all entries in a list, including the list head contain a LIST_ENTRY structure). Therefore if you call InsertHeadList passing the address of "Entry 2" FLINK/BLINK structure as the address of the list head and passing in "Entry 3" to be added to the list, the results of the operation will look like (See Figure 6).
|
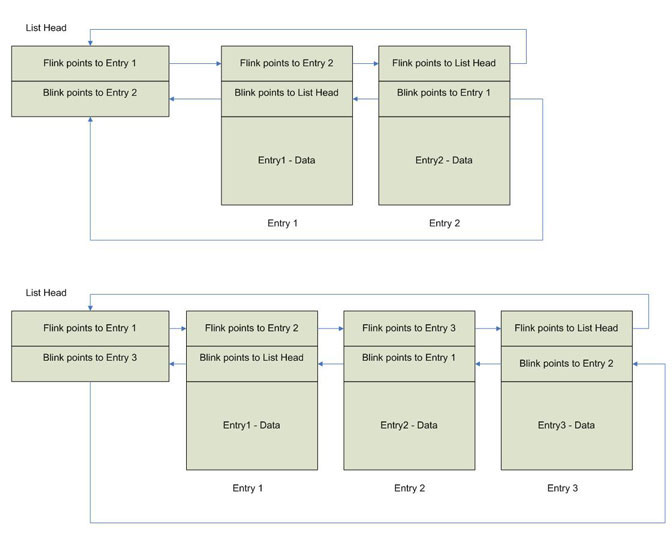
Figure 6 - Inserting Entry 3 Using Entry 2 as List Head |
Notice what has happened here. As you should remember, we called InsertHeadList passing in the address of "Entry 2's" FLINK/BLINK as the address of the list head and passed in "Entry 3" to add. The InsertHeadList routine then performs the following operations:
- Saves away the contents of list heads FLINK in a temporary PLIST_ENTRY variable Tmp (List Head).
- Updates "Entry 3's" FLINK with the contents of Tmp.
- Updates 'Entry 3's" BLINK with the address of the passed-in list head (i.e. Address of "Entry 2").
- Set Tmp->BLINK ("List Head") to the address of "Entry 3".
- Set the FLINK address of the passed-in list head FLINK to Entry 3.
Now that we know how to add entries, we should talk about removal. The next sections talk about the operations available for removing entries from a doubly-linked list.
RemoveHeadList
RemoveHeadList as the name indicates removes an entry from the top of the list. However, there is a catch to this routine. There has to be an entry on the list to remove! Therefore any call to RemoveHeadList should be preceded by a call to IsListEmpty. If IsListEmpty returns TRUE, then you know the list is empty and you should not call RemoveHeadList.
RemoveTailList
RemoveTailList is similar to RemoveHeadList except that it removes a entry from the tail of the list as opposed to the head. This routine also has the same limitation as RemoveHeadList, so the caller must ensure that a call to this routine is preceded by a call to IsListEmpty to ensure that there are entries in the list to remove.
RemoveEntryList
While there is no InsertEntryList function, there is indeed a RemoveEntryList function. This function allows you to remove an existing entry in the list. This function presumes that when you call this function you have the address of the entry that you want to remove. This routine returns TRUE if the entry was removed from the list, and FALSE otherwise.
Interlocked Lists
Our previous discussion assumed that no list synchronization was necessary, but realistically is that ever the case? Probably not! Therefore we should talk about synchronizing access to linked lists. As you should all know, synchronization is necessary whenever you have 2 or more threads of execution that may touch a shared data structure simultaneously. What synchronization mechanism you choose depends on the Interrupt Request Level (IRQL) of the threads involved. If your threads are running at IRQL < DISPATCH_LEVEL then a Dispatcher type object (Event, Semaphore, Mutex, etc) is appropriate. If, however, one or both of the threads of execution are running at DISPATCH_LEVEL then a KSPIN_LOCK must be used.
Even more interesting, Windows provides a set of functions that can be used to manipulate linked lists irrespective of IRQL. Yup, these functions will even ensure appropriately synchronized access at DIRQL. The functions I'm referring to are the ExInterlockedXxxx family of functions.
ExInterlockedXxxxx
ExInterlockedInsertHeadList and ExInterlockedInsertTailList allow the caller the ability to atomically insert an entry to the head or tail of a doubly-linked list, respectively. These routines, which work at any IRQL, take as input the address of the list head, the address of the list entry to add, and the address of the KSPIN_LOCK that will be used serialize access to list.
What makes these routines special is that they allow you to insert or remove entries from the list at any IRQL, even DIRQLs. What allows this "any IRQL" use is the unique implementation of list locking that these routines use. The KSPIN_LOCK structure that's used to protect the list is not used as an ordinary executive spin lock. As a result, if you use the ExInterlocked functions to access a given list, all access to that list must be done using ExInterlocked functions. It is a serious programming error to intermix the use of ExInterlocked functions with any other list access functions. Further, you must not use the KSPIN_LOCK that's associated with the list for any other purpose - The lock is acquired in a special way and must never be acquired using the typical spin lock functions such as KeAcquireSpinLock.
Naturally if you are going to use access these ExInterlocked lists routines, the list head and the list entries must be resident, i.e. in Non-Paged pool.
These routines also have their opposites, namely ExInterlockedRemoveHeadList and ExInterlockedRemove TailList. As with their counterparts, these routines allow you to atomically remove an entry from either the head or tail of the list.
No ExInterlockedRemoveEntryList
You may notice that there is no mention of an ExInterlockedRemoveEntryList function, and that is because no such function exists. Thus, if you are going to use the interlocked functions you are restricted to removing entries from either the head or the tail of the list. Furthermore, there is no way to traverse the list as there is no provided mechanism to serialize access to the list while you are traversing it.
Queuing IRPs
If you have had a chance to look over the routines that we have been talking about in the DDK/WDK documentation, you will notice that when an entry is added to a list you always pass in the address of the LIST_ENTRY structure to be used for linkage. Further, when you remove an entry from the list you always get returned a PLIST_ENTRY which is the address of the LIST_ENTRY structure used for the linkage. Now this is all well and fine if the LIST_ENTRY structure is the first entry in your data structure (as in our definition of MYDATASTRUCT earlier in this article), since the address of the returned PLIST_ENTRY is essentially the same address as the start of our structure. But, what if the entry you want to add to your list is an IRP, where the LIST_ENTRY field is not at the start of the data structure? If you look at the definition of an IRP in wdm.h, you'll notice the field Tail.Overlay.ListEntry. This field is a LIST_ENTRY structure that you can use to queue the IRP as long as your driver owns the IRP. Therefore to insert the IRP into your queue you would do the following:
InsertTailList(&ListHead,&pIrp->Tail.OverLay.ListEntry) ;
where ListHead is the address of the list to insert the IRP on. When you want to remove an IRP from this list you would do the following:
PLIST_ENTRY pListEntry = RemoveHeadList(&ListHead);
where ListHead is the address of the list from which an entry is to be removed. The pListEntry being returned is the address of the Tail.Overlay.ListEntry field in the IRP, not the start address of the IRP itself - remember, RemoveHeadList returns the address of the PLIST_ENTRY entry used to enqueue the entry. So how do we get the start address of a structure if we are returned an address of a field inside the structure? Well, we use the CONTAINING_RECORD macro. This macro, much like the offsetof macro in "C", allows us to compute the starting address of a structure given the name of the structure and the name of a field within that structure. This routine does no validation whatsoever, so it is up to you to make sure that the inputs are valid. Thus, in our previous example where we removed the IRP from the list in order to get the address of the start of the IRP, we would make the following call:
PIRP pIrp = CONTAINING_RECORD(pListEntry,
IRP,
Tail.
Overlay.
ListEntry);
Traversing a List...
Another topic that we should talk about is traversing a list. Since a Windows doubly-linked list is a circularly linked list, you can't just traverse the list looking for an entry with a FLINK containing NULL because there is not going to be one. Therefore, the only way to reliably traverse the list is to compare the FLINK value of a list entry to the address of the list head in order to determine if the entire list has been traversed. Figure 7 illustrates how to traverse a doubly-linked list using a "while" loop. This traversal could just as easily be done using a "for" or "do" loop.
|
PLIST_ENTRY pENTRY = PListHead->Flink;
While(pENTRY != PListHead)
{
PMYDATASTRUCT pStrct;
//
// Do some processing.
//
pStrct = (PMYDATASTRUCT) CONTAINING_RECORD(pEntry,MYDATASTRUCT,ListEntry);
//
//Move to next Entry in list.
//
pEntry = pEntry->Flink;
}
Figure 7 - Traversing a Doubly-Linked List |
WinDbg
Before summarizing this article up we should mention that WinDbg contains an extension command that allows the user to traverse their lists in the debugger. Check out the "!list" extension in the WinDbg help documentation.
Summary
Windows doubly-linked lists are a great construct to use when there is a need to implement a linked list in your code. Windows implements the routines necessary to manipulate and synchronize your lists, while WinDBG provides commands to help you debug any list associated problems.


 Post Your Comment

